
In the ever-expanding universe of smart technology, the fusion of cutting-edge hardware and versatile platforms has paved the way for unprecedented motion detection technology. One such combination, Seeed Studio’s 24GHz mmWave Sensor and ESP32 has opened new frontiers in the realm of sensor integration and home automation. In this immersive journey, we explore the seamless marriage of these technologies, bridged by ESPHome and orchestrated within the intuitive environment of Home Assistant.
Project Prerequisites:
- Running ESPHome and Home Assistant.
- An ESP32 Board. We will be using our Arduino Nano ESP32.
- Seeed Studio’s 24GHz mmWave Sensor
- Jumper Wires and a 5Volts Power Supply.
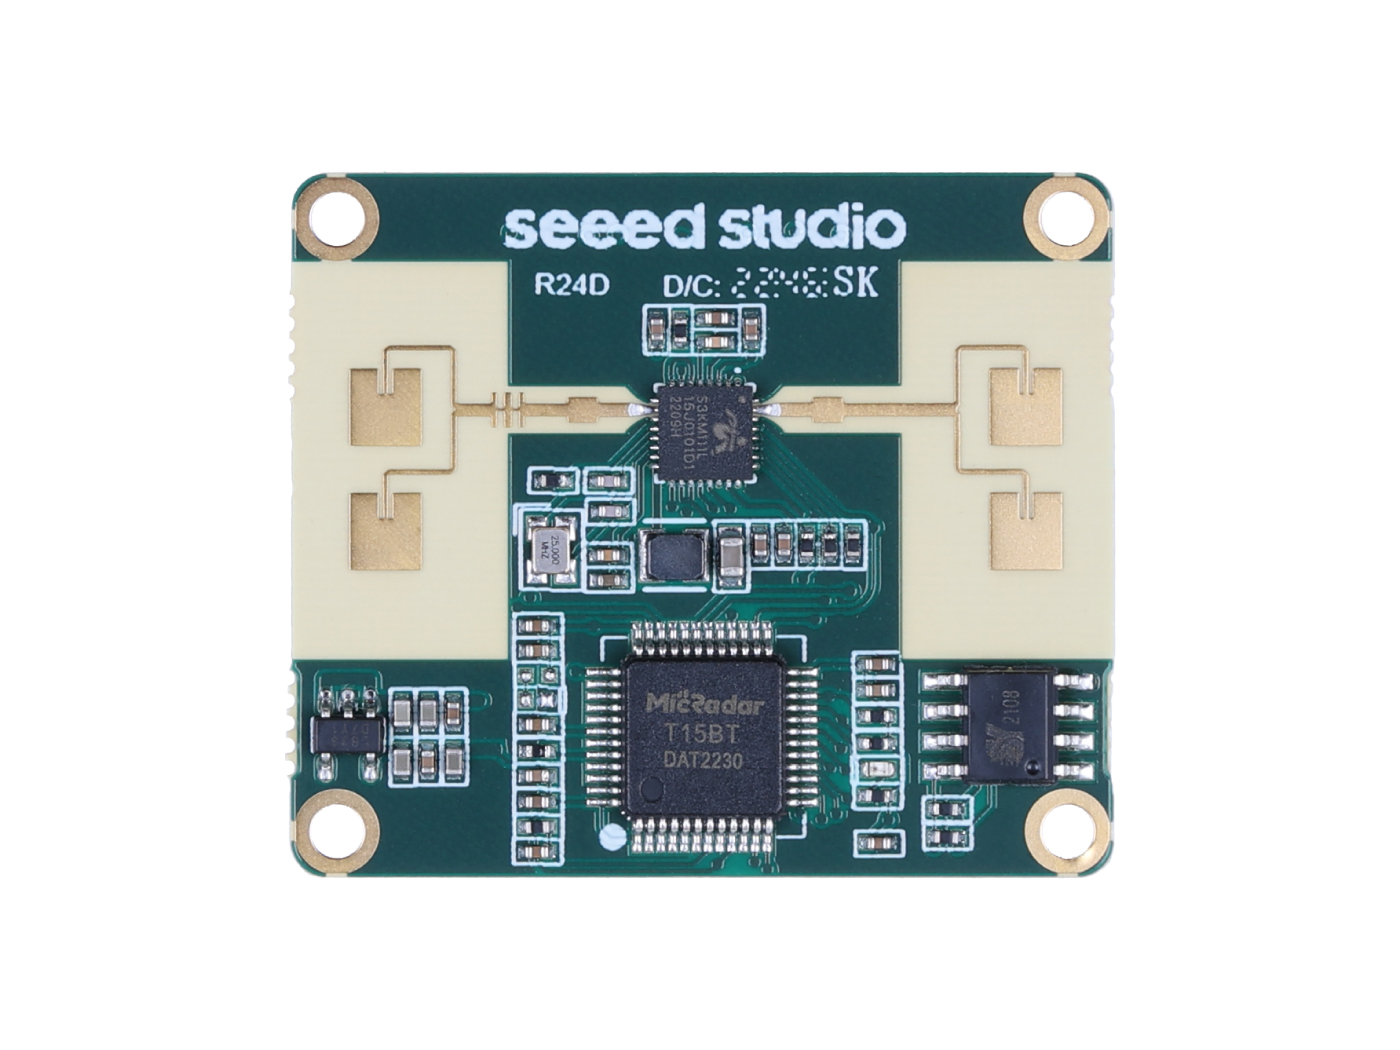
Our MilliMeter Wave Sensor: Seeed Studio 24GHz mmWave Sensor
At the heart of this project lies Seeed Studio’s 24GHz mmWave Sensor, a marvel in the realm of proximity detection and motion sensing. Leveraging the power of millimeter-wave technology, this sensor offers unparalleled accuracy and sensitivity, enabling precise detection within its operational range. Its versatility spans applications in security, occupancy detection, and gesture recognition, making it a powerhouse in the domain of smart sensors.
The Bridging Force: ESPHome ESPHome is a game-changer in simplifying the integration of ESP-based devices into Home Assistant. With its intuitive YAML-based configuration, ESPHome streamlines the process of defining sensors, configuring WiFi, and creating custom firmware for ESP devices. This bridging tool acts as the conduit between the sensor and Home Assistant, enabling a fluid exchange of data and commands.
Orchestrating Intelligence: Home Assistant
![]() In the realm of home automation, Home Assistant stands tall as a comprehensive and user-friendly platform. Its open-source nature and extensive library of integrations make it the go-to choice for managing smart homes. With seamless compatibility with ESPHome, Home Assistant becomes the central hub for receiving, analysing, and acting upon the data from the Seeed Studio sensor, transforming raw information into meaningful automation and insights.
In the realm of home automation, Home Assistant stands tall as a comprehensive and user-friendly platform. Its open-source nature and extensive library of integrations make it the go-to choice for managing smart homes. With seamless compatibility with ESPHome, Home Assistant becomes the central hub for receiving, analysing, and acting upon the data from the Seeed Studio sensor, transforming raw information into meaningful automation and insights.
Arduino Nano ESP32-S3 Specifications & Pinouts:
The Nano ESP32 features the ESP32-S3 system on a chip (SoC) from Espressif, which is embedded in the NORA-W106 module. The ESP32-S3 has a dual-core microprocessor Xtensa® 32-bit LX7, and has support for the 2.4 GHz Wi-Fi® band as well as Bluetooth® 5. The operating voltage of this SoC is 3.3 V.
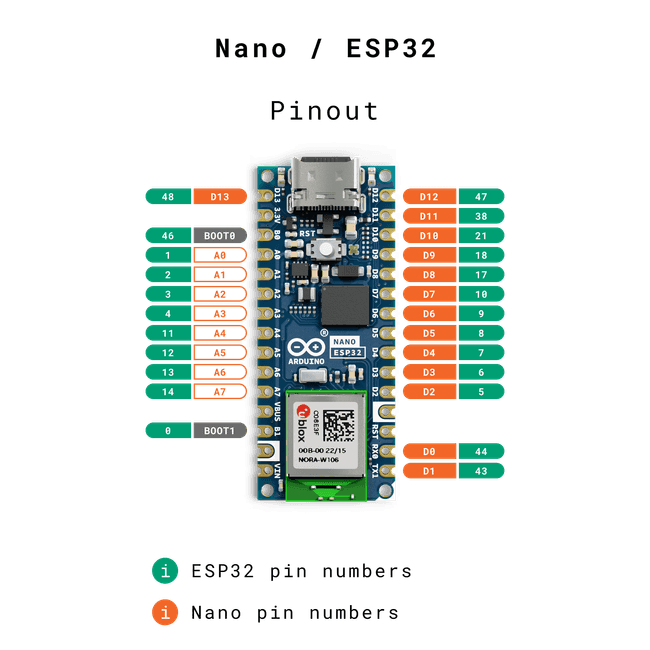
The Nano ESP32 has:
- 384 kB ROM
- 512 kB SRAM
- 16 MB of Flash (external, provided via GD25B128EWIGR)
- 8 MB of PSRAM
The datasheet for further information of this module can be found at ABX00083-datasheet.pdf (arduino.cc)
Millimetre Wave Module – Seeed Studio 24GHz mmWave Sensor
Moving on, As our mmwave module, we will be trying out 24GHz mmWave Sensor – Human Static Presence Module Lite (MR24HPC1). It is an is an antenna-integrated, health-friendly mmwave radar sensor that applies FMCW ranging technology, with operation in 24GHz, for implementation of human presence, independently of environmental influences. This is also a personalized radar that users can configure underlying parameters of it to determine detected functions.
Please refer to the below images for product visuals and pinouts:
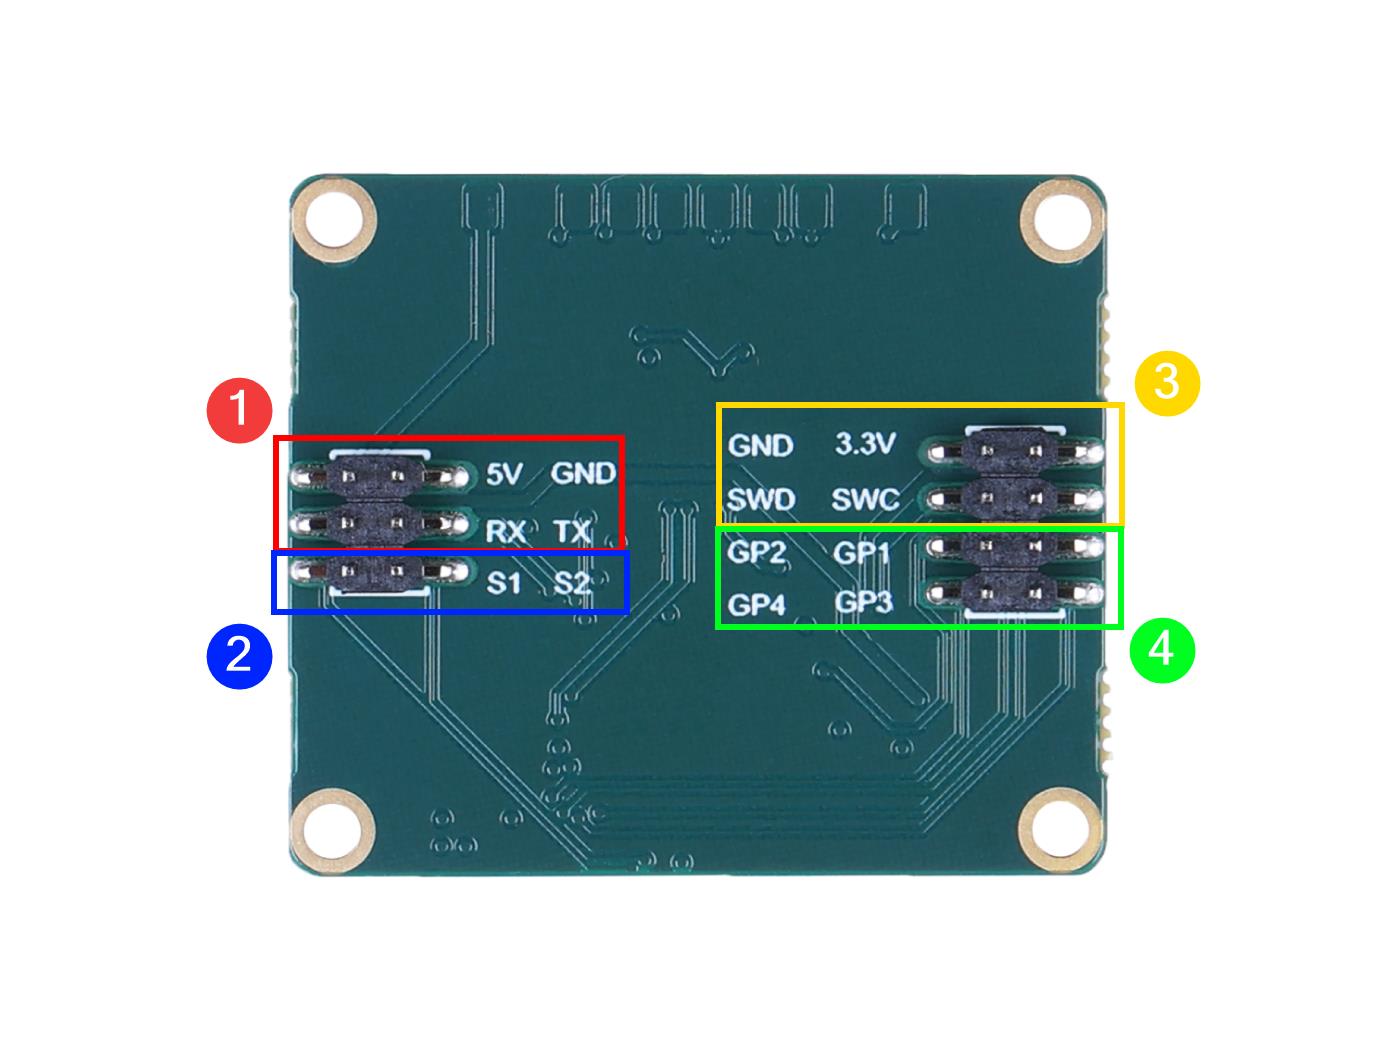
For our current project, We will be using the pins marked as 1 (In Red) to interface with the ESP32 Chip using the following wiring scheme:
| ESP32 PIN | mmWave Module Pin |
| 5V | 5V |
| GND | GND |
| PIN 44 (RX) | TX |
| PIN 43 (TX) | RX |
We will be using the ESPhome header and packages yaml from thefipster github account. You are also required to download the correct config files needed for each sensor and place them in the ESPHome folder as below:

- Header File for mr24hpc1: https://github.com/thefipster/esphome-mmwave-sensors/blob/main/headers/mr24hpc1.h
- Package Yaml for mr24hpc1: https://github.com/thefipster/esphome-mmwave-sensors/blob/main/examples/mr24hpc1.yaml
We assume that you already know about the basics of ESPHome and have added your ESP32 Device to it. For a quick read on how to do this, refer to:
Once you have connected the module and ESP32 together, You should now access your ESP32 in the ESPHome and enter the below code.
ArduinoESP-mmWave ESPHome Configuration:
substitutions:
  device_id: my-mr24hpc1-sensor
  device_name: My MR24HPC1 Sensor
  uart_rx_pin: "44"
  uart_tx_pin: "43"

packages:
  device_base: !include packages/mr24hpc1.yaml

esphome:
  name: arduino-esp32s3
  friendly_name: Arduino ESP32S3

esp32:
  board: esp32-s3-devkitc-1
  framework:
    type: arduino

# Enable logging
logger:
  level: DEBUG

# Enable Home Assistant API
api:
  encryption:
    key: ""

ota:
  password: ""

wifi:
  ssid: !secret wifi_ssid
  password: !secret wifi_password

uart:
  id: soft_uart2
  baud_rate: 115200
  rx_pin: GPIO44
  tx_pin: GPIO43
  debug:
    direction: BOTH
    dummy_receiver: false
    after:
      delimiter: "\n"
    sequence:
      - lambda: UARTDebug::log_string(direction, bytes);

sensor:
  - platform: uptime
    name: "ArduinoESP Sensor"
    id: "uptimeESP"

switch:
  - platform: restart
    name: "ArduinoESP Restart"

Thats it. Flash the above code and the device should be ready to go in your Home Assistant Window.
You can now create beautiful entity cards using the mushroom cards or integrate this setup further with Smart indicator lights and other sensors.
Check out our other Home Assistant and ESP based projects below.
